
Cranberry-Orange Breakfast Scones
FORTISVEX · HOLIDAY RECIPES
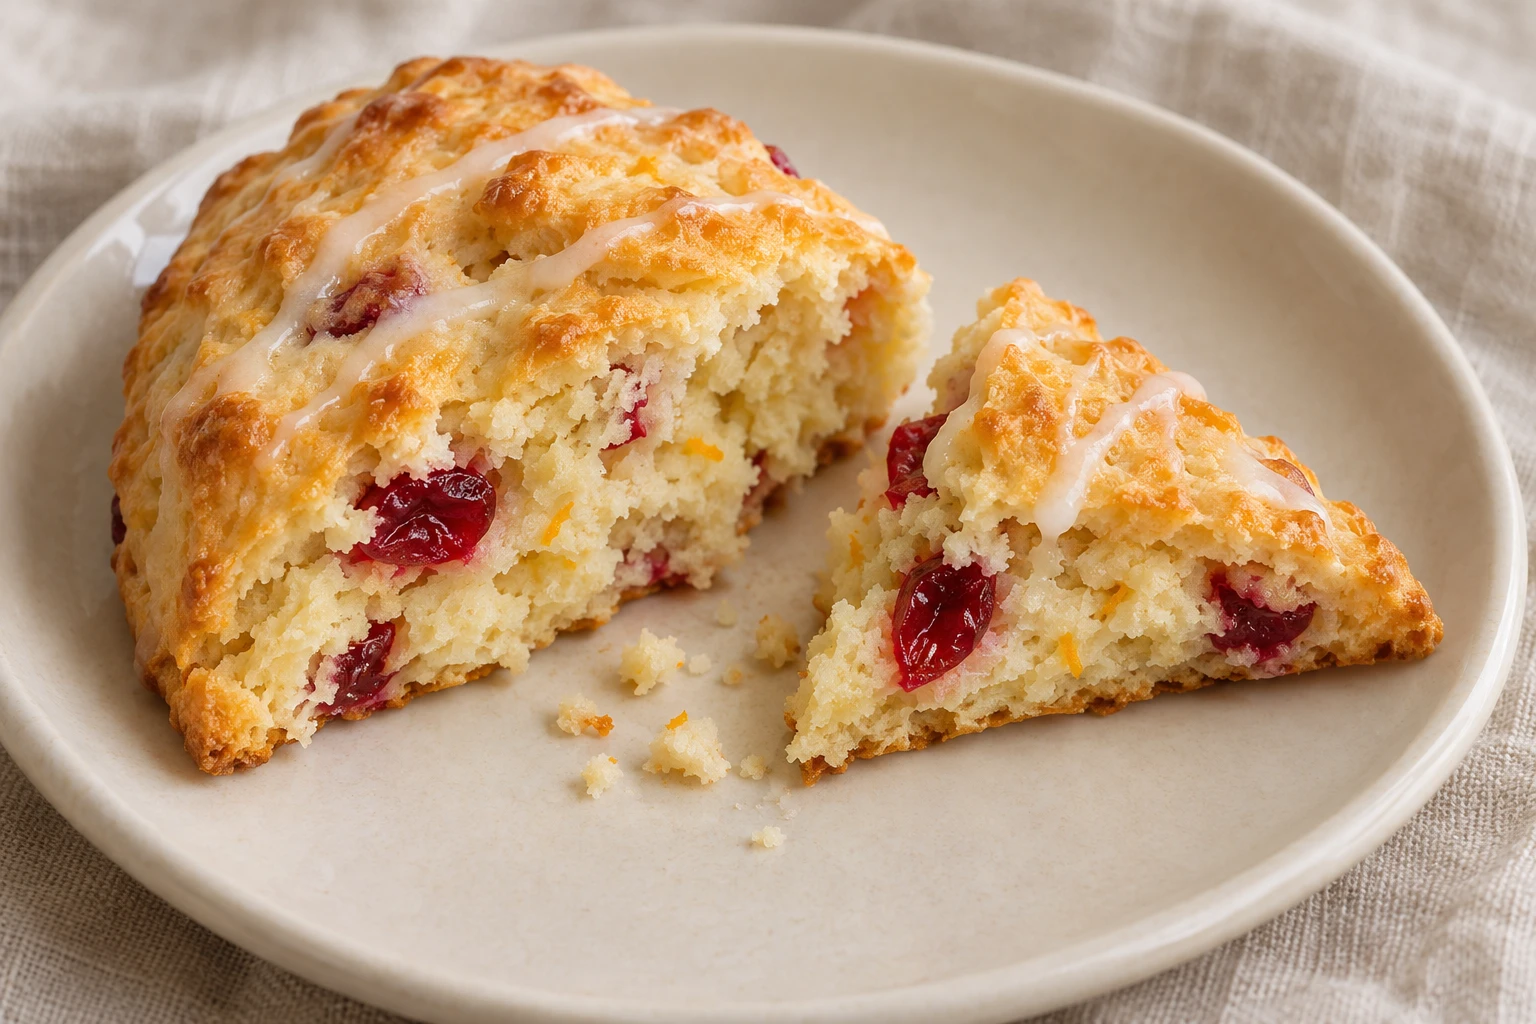
Tart cranberries, fragrant orange zest and a little orange glaze give these breakfast scones a bright place on a winter table. The dough is buttery without being cake-like, with golden edges and a tender middle. Fresh or frozen cranberries bring small, juicy bursts of acidity that balance the sweet finish.
Serve a batch for Christmas breakfast, add it to a winter brunch, or freeze a few unbaked wedges for a quieter morning. There is no mixer or rolling pin involved. The most useful habits are keeping the butter cold, measuring the flour carefully and stopping the mixing while the dough still looks a little rough.
Jump to the recipe · What to serve alongside · Make ahead and storage

A bright, buttery breakfast scone
The orange flavor comes mainly from zest rubbed into the sugar. This distributes its fragrant oils through the dough without adding enough juice to make the mixture wet. Orange juice belongs in the glaze, where its sharpness is useful against powdered sugar.
The cranberries should stay distinct. Halve fresh berries rather than chopping them to a pulp; a few red streaks in the dough are fine, but too much crushing spreads their moisture throughout it. Cold butter leaves small pockets in the dough, while cream and egg give the crumb richness and structure. Expect a tender, gently crumbly scone rather than the open, chewy texture of bread or the many thin layers of a croissant.
Fresh, frozen and dried cranberries are different
Fresh cranberries are the first choice here. Pick out any soft or damaged berries, rinse the rest and dry them well before halving. Measure the whole berries before cutting, or use the 150-gram weight. Water left on the berries makes the dough harder to handle.
Unsweetened frozen cranberries also work. Use the same weight straight from the freezer and leave them whole; do not thaw or try to halve hard, slippery berries. Frozen fruit can keep the centers cooler, so allow a few extra minutes in the oven and check the baked crumb rather than relying only on the clock.
Sweetened dried cranberries are chewy, sweeter and much less juicy. They do not create the tart pockets shown here. A dried-fruit variation appears below, but it changes the character of the recipe rather than reproducing the fresh-fruit result.
Cranberry-Orange Breakfast Scones
Yield: 8 triangular scones; 8 servings, one scone each
Prep: about 30 minutes, including glazing · Chill: 20 minutes · Bake: about 25 minutes · Cool: 20 minutes · Total: about 1 hour 35 minutes
Oven: 400°F (200°C), conventional oven
Before you begin: Start with cold butter, cream and egg. The total assumes fresh cranberries and an oven that finishes preheating during the chill. Baking can take 22 to 26 minutes, or longer with frozen berries; the 25-minute allowance is an estimate. The cooling time includes 5 minutes on the pan and 15 minutes on a rack. Allow extra cooling if the scones are still hot enough to melt the glaze.
Equipment
- Large rimmed baking sheet, about 13 by 18 inches (33 by 46 centimeters), parchment paper and a cooling rack
- Large mixing bowl, small bowl, measuring jug, whisk and flexible spatula
- Kitchen scale or measuring cups and spoons; fine grater for orange zest
- Pastry cutter or two table knives, sharp knife or bench scraper, cutting board and pastry brush
Ingredients for the scones
Weights give the most consistent dough. If using cups for flour, fluff it, spoon it into the cup and level the top; do not scoop and pack it. Measure cranberries whole before halving.
- 2½ cups (300 grams) all-purpose flour, plus up to 1 tablespoon (8 grams) for the work surface and cutter
- ⅓ cup (67 grams) granulated sugar
- 1 tablespoon (6 grams) finely grated orange zest, from about 1 large orange; avoid the white pith
- 1 tablespoon (12 grams) baking powder
- ½ teaspoon (3 grams) fine salt
- ½ cup (113 grams) cold unsalted butter, cut into ½-inch (1.25-centimeter) cubes
- 1½ cups (150 grams) fresh cranberries, rinsed, dried well and halved, or 150 grams unsweetened frozen cranberries, kept frozen and whole
- ⅔ cup (160 milliliters) cold heavy cream for the dough, plus up to 2 tablespoons (30 milliliters) only if needed
- 1 large cold egg, about 50 grams without its shell
- 1 teaspoon (5 milliliters) vanilla extract
- 1 tablespoon (15 milliliters) heavy cream, for brushing the tops
Ingredients for the orange glaze
- ½ cup (60 grams) powdered sugar, sifted if lumpy
- 1 tablespoon (15 milliliters) fresh orange juice, plus up to 2 teaspoons (10 milliliters) more as needed
Instructions
- Prepare the pan and fruit. Line the baking sheet with parchment. Rinse and dry the orange before zesting it. Prepare the fresh cranberries as listed, or keep frozen cranberries in the freezer until needed. Return the measured cream and egg to the refrigerator while you work with the dry ingredients.
- Rub the zest into the sugar. In the large bowl, rub the granulated sugar and orange zest together with clean fingertips until evenly fragrant. Whisk in the 2½ cups (300 grams) flour, baking powder and salt so the leavening is distributed throughout.
- Cut in cold butter. Add the cubed butter. Use a pastry cutter or two table knives to cut it into the flour mixture until most pieces are about pea-size, with some smaller crumbs. Do not work it into a smooth paste. If the butter begins to feel soft or greasy, refrigerate the bowl for 10 minutes before continuing; this is extra time beyond the listed chill. Gently toss in the cranberries.
- Bring the dough together gently. Whisk the ⅔ cup (160 milliliters) cream, egg and vanilla in the measuring jug. Pour over the flour mixture and fold with a spatula just until moist clumps form. Press a little dough together: it should hold without feeling fluid. If a substantial layer of dry flour remains and the clumps will not hold, fold in additional cream 1 tablespoon (15 milliliters) at a time, using no more than the listed 2 tablespoons (30 milliliters). Do not add the extra cream automatically.
- Shape and cut eight wedges. Lightly dust the work surface and cutter with some of the extra flour. Tip out the dough and press the loose pieces together with your hands, folding the mass over itself once or twice only if needed. Pat into an even 8-inch (20-centimeter) round about 1 inch (2.5 centimeters) thick. Cut straight down into 8 equal wedges without sawing. Transfer them to the lined sheet, leaving about 2 inches (5 centimeters) between them.
- Chill the shaped scones. Refrigerate the tray for 20 minutes. Meanwhile, heat a conventional oven to 400°F (200°C) with a rack in the middle. If the tray will not fit in the refrigerator, chill the wedges on a smaller parchment-lined tray, then transfer them to the baking sheet. Keep the dough chilled until the oven is fully heated.
- Brush and bake. Brush the tops lightly with the remaining 1 tablespoon (15 milliliters) cream, avoiding heavy drips down the cut edges. Bake for 22 to 26 minutes, rotating the sheet once near the end if browning is uneven. Allow approximately 2 to 5 minutes more for frozen cranberries. Look for golden tops and bottoms, set sides and a center that is baked through rather than wet or pasty. A thin skewer inserted into the thickest part, avoiding a berry, should show a few dry crumbs but no raw dough. If the tops brown too quickly, tent loosely with foil and continue baking; do not remove scones with doughy centers just because their tops have colored.
- Cool before glazing. Leave the scones on the sheet for 5 minutes, then transfer them to a rack for about 15 minutes more. They should be only slightly warm before glazing. While they cool, whisk the powdered sugar with 1 tablespoon (15 milliliters) orange juice in the small bowl. Add extra juice ½ teaspoon (2.5 milliliters) at a time, up to the listed 2 teaspoons (10 milliliters), until the glaze falls from a spoon in a thick ribbon.
- Drizzle and serve. Put the rack over the parchment-lined pan to catch drips. Spoon a few thin lines of glaze across each scone, dividing it among all 8. Serve slightly warm or at room temperature. Let any remaining scones finish cooling before packing them for storage.
Raw-dough safety: Do not taste the dough. Raw flour and eggs can carry harmful bacteria. Keep them away from ready-to-eat food, and wash hands, utensils and work surfaces after handling them. See the FDA’s flour-handling guidance.
What to serve with cranberry-orange scones
For a simple breakfast: Offer hot coffee or black tea and a bowl of plain yogurt. The yogurt’s cool, tangy character works with the rich scone, and an unsweetened drink leaves room for the glaze. Add orange segments if you have fruit left after zesting and juicing.
For a Christmas brunch: Set the scones beside softly scrambled eggs or a vegetable frittata and a bowl of sliced pears or citrus. The savory dish balances the sweet pastry without requiring another dessert-like breakfast. Keep egg dishes and yogurt at safe serving temperatures rather than leaving them out throughout a long gathering.
For an afternoon tray: Skip the glaze if you plan to serve marmalade or jam. A small amount of softened butter is enough for people who want a richer bite. Serve spreads separately so everyone can choose; the glazed version does not need both jam and extra sugar.
Substitutions and dietary notes
- Dried cranberry variation: Replace the fresh fruit with ¾ cup (90 grams) sweetened dried cranberries. Do not soak them for this version. The result will be sweeter and chewier, with fewer moist fruit pockets. Use the same initial cream quantity, then add the reserved cream only if the dough needs it. Consider omitting the glaze.
- Lemon instead of orange: Use 2 teaspoons (4 grams) finely grated lemon zest in the dough and lemon juice in the glaze. The flavor will be sharper, so start with the minimum glaze liquid and taste the glaze, not the raw dough.
- Salted butter: Use the same ½ cup (113 grams) and reduce the added fine salt to ¼ teaspoon (1.5 grams). Salt content varies by butter brand, so the flavor may differ slightly.
- No glaze: Omit both glaze ingredients for a less sweet scone. The dough still contains sugar; this is not a sugar-free recipe.
- Milk is not a direct cream substitute: It contains less fat and changes dough hydration. Keep heavy cream for the intended texture rather than replacing it cup for cup with milk.
- Allergens: The recipe contains wheat, milk and egg. It has no nuts as written, but inspect ingredient labels and prevent cross-contact when cooking for someone with an allergy. It is vegetarian, not vegan, dairy-free or gluten-free.
- Dietary adaptations: Gluten-free flour blends, plant-based fats and egg substitutes can change spread and structure. No allergy-specific version has been validated here; use a dedicated recipe that meets the needed restriction rather than promising an equivalent result from several simultaneous substitutions.
Make ahead, cool and store
Shape the night before: Put the cut wedges on a parchment-lined tray, cover without pressing on the dough and refrigerate for up to 12 hours. Brush with cream immediately before baking. Bake directly from the refrigerator, checking at the original time and allowing a few extra minutes if needed. Keep the refrigerator at 40°F (4°C) or below; the FDA recommends this temperature for storing eggs.
Freeze unbaked wedges: Freeze the shaped, unbrushed scones on a lined tray until firm, then transfer to an airtight freezer bag or container. Label with the date and use within 1 month for best quality. Bake from frozen at the same 400°F (200°C), brushing with cream first. Start checking after about 27 minutes and allow longer as needed; size, fruit temperature and your oven affect the finish. Use the same baked-through center checks, not the extra minutes alone.
After baking: Cool scones in a single layer on a rack so steam can escape. Do not close a container around hot scones; trapped moisture softens the crust. For this fresh-fruit version, a conservative storage plan is to refrigerate cooled scones within 2 hours after baking, or within 1 hour above 90°F (32°C). Pack airtight and use within 3 days, or freeze them for longer keeping. These are home-storage recommendations, not a measured shelf-life guarantee. Keep any yogurt, cream or other perishable accompaniments refrigerated separately.
Handle perishables promptly: Refrigerate raw egg-and-cream dough and perishable accompaniments within 2 hours, or within 1 hour if the surroundings are above 90°F (32°C). Count the cumulative time outside safe cold or hot holding across preparation and serving; returning food to the refrigerator does not restart the clock. Do not leave a tray of raw scones on the counter overnight. Follow FoodSafety.gov’s chilling and cross-contamination guidance, and clean the rack, brush and serving plate rather than reusing items that touched raw dough without washing them.
Freeze baked scones: For the best finish, freeze them unglazed. Once fully cool, wrap individually and place in an airtight freezer container. Aim to use within 2 months for quality. Thaw overnight in the refrigerator. You can freeze glazed scones too, but their glaze may turn sticky as they thaw.
Warm for serving: Refresh an unglazed, refrigerated or thawed scone in a 325°F (165°C) oven for about 8 to 12 minutes, until warmed to your preference. Let it cool slightly before adding fresh glaze. Glazed scones can be warmed briefly, but the topping will soften. This warming step is for texture, not a way to make mishandled food safe.
Small fixes for better scones
The dough falls apart: First press a handful together. A shaggy mixture often holds once it is gathered. If it truly will not bind, use the reserved cream a tablespoon at a time. Pouring in a large splash can turn a manageable dough sticky.
The dough is sticky or the butter smears: Pause and chill it rather than kneading in handfuls of flour. Use a lightly floured cutter and a spatula to move the wedges. Some tackiness is normal; a slick, soft dough needs cooling.
The scones spread: Check that the butter stayed cold, the wedges received their chill and the oven was fully heated. Too much liquid or too little flour can also reduce their shape. Keep the starting round evenly thick so the narrow tips do not burn before the centers bake.
The glaze disappears into the top: The scones are too warm or the glaze is too thin. Cool the scones longer. If necessary, whisk a little more powdered sugar into the glaze, then drizzle sparingly rather than pouring on a thick coating.
Bring out the scones with a hot drink and something fresh alongside. Their tart fruit and orange aroma suit a holiday breakfast, while the freezer option makes the same recipe useful on an ordinary winter morning.
Recent Posts
-

Poland and Indonesia: Check the Top Band Before the Size
Poland and Indonesia both use red and white in two equal horizontal bands. The quickest distinction …Nov 18th 2026 -

Sweden and Finland: Compare the Crosses at the Same Height
Sweden’s yellow cross on blue and Finland’s blue cross on white share a familiar arrangement: the up …Nov 18th 2026 -

Charcoal-Kettle Savoy Cabbage Wedges with Mustard Vinaigrette
Savoy cabbage’s crinkled leaves catch a little oil and brown at their edges, while the thicker base …Nov 18th 2026